
Hello everyone! If you've been following my blog, you know that my latest addiction is making graphghan patterns using the Free Pattern Wizard on www.stitchboard.com. So far, this is the best, most user-friendly tool I have found to make crochet graphs. It is really simple to use, and pretty intuitive to figure out, but here is a tutorial for those of you who are interested. This tool is much easier and quicker than using a spreadsheet to transfer your design to a graph format.
1. First of all, choose your image. I recommend using a simple image such as a logo or silhouette to start with, but the Free Pattern Wizard can be used for almost any image you can think of. For this tutorial, I chose to use a simple star shape that I made in MS Paint.

2. Open the Free Pattern Wizard on stitchboard.com. Anyone can use this online tool, even if you don't have a registered account on stitchboard. I highly suggest creating an account, though, because you have access to a lot more options if you are a registered member. Plus, they NEVER send you junk email, ever. As a member of the site you also have access to many crafting forums and the admins are really helpful. The pattern wizard should look like this:

3. In the first box, where it says "Image to Convert into a Pattern", click the "choose your file" button and upload whatever picture you want to turn into a graph. Choose your crafting category in box 2. I mainly crochet, so that's the option I picked. Next you choose your stitch type in box 3. I usually just choose standard, but if you like to work in filet or tunisian, choose one of those. In box 4 you pick your stitch shape. Since I chose "Standard" in the previous box, standard shape is the only option available to me here.
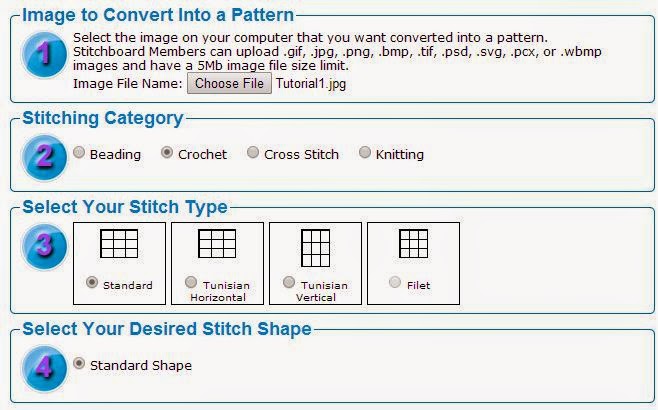
4. Now it's time to choose your color palette. I make patterns without thinking of a specific brand of yarn, so I stay with the standard. stitchboard palette. Sections B and C here will depend on your specific image. I chose a very simple image to convert so I went with the simplest options here. The automatic color match is good for images that don't have many colors or shading, but choosing your own colors can be good if your image is slightly pixelated or has a lot of shading. I chose to limit the number of colors to 2; white and yellow, just to ensure that it transferred without getting messed up. If you have an image with 3 or more colors, I would recommend choosing to limit your colors and then choosing your desired colors to match the number of colors you want.
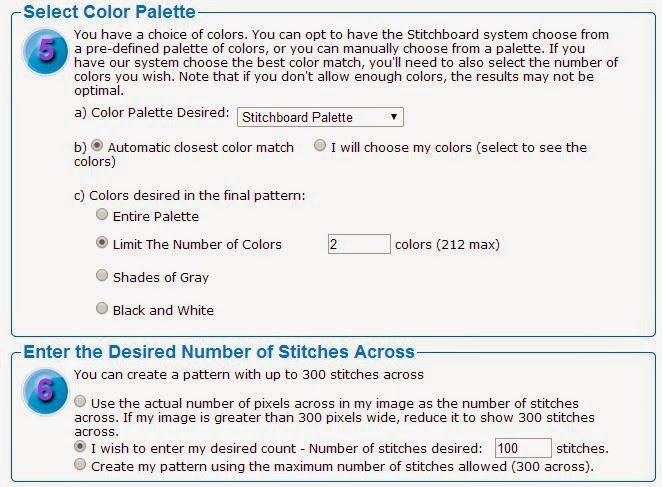
5. Box 6 asks you to choose the size of your graph. Non-registered users can have a maximum of 100 stitches across, which would make a very small size throw. This is another reason I recommend registering because stitchboard members can request up to 300 stitches across as a default, and the admins may also give you additional stitches if you request it for a specific project. I think 200-300 stitches make a good size blanket, and 30-60 stitches across can be used to make pillows or smaller blocks that can be joined together to make a larger project. I chose 100 stitches for my tutorial image just because it seemed like a good even number to use.
6. Next you will choose your output format in box 7. I always choose to display on screen because I like to download and clean up my patterns. Box 8 allows you to adjust your image before it is converted into a graph. There is a bit of a learning curve to using this part and I admit I don't know exactly how to use all of the options here. I like to adjust to smoothness to a 5 or higher to smooth out the lines of my graph so I have less to clean up on the finished product. I also like to check the Stray Pixel Cleanup box with the "light" option just in case my original image isn't as neat as I thought. For a more detailed explanation of all these options, check out the Stitchboard help page here.

7. Finally, in box 9, click the "Let's See My Pattern" button to get your graph on a new page. It will look something like this:

8. You will have several options on this page. I always choose "Download Pattern" so I can save and edit out any kinks or weird spots in my graphs. If you aren't satisfied with your graph, don't worry, you can always trying changing the settings or simply erasing and starting over. You may have a lot of trial and error until you figure out how you like your graphs to look and what settings you prefer, but experimenting is part of the fun!
That concludes this tutorial on how to make a crochet graph pattern using the Free Pattern Wizard on Stitchboard.com. Check Part II for tips on cleaning up and editing your graph using MS Paint.
Sponsored Links:
from: Leisure Arts, Inc.Crochet: Basics & Beyond - $19.99
from: Craftsy
No comments:
Post a Comment